Title

Title

Wednesday, August 28, 2013

Thanks Emily
Here is Emily Stouts entry, another top 25 winner. Congratulations.
 It is beautiful and we are keeping our fingers crossed for her. 
Check out a few more entries on the Marcus Brothers blog

Tuesday, August 27, 2013

Sweet Summertime
Summer is almost over and we have just completed our
first Summer Block of the Week. It was fun and I hope
everyone who participated enjoyed the project. If you missed
out the pattern is now available. This is a great project for all 
your favorite scraps. This project also uses 1 yard of Kona 
Natural for the background which you can find here
Also included is the acrylic template for the mini dresden plates.

Friday, August 23, 2013

Hooray!
My quilt was chosen as one of the top 25 in the 
an antique row quilt that I thought would be perfect
to feature Judie Rothermel's 25th Anniversary Collection.
I am so excited as you can see and am keeping my fingers
crossed that it will be chosen as one of the top 3 prize winners.
- - - Here are a few more pictures - - -


More good news Linda's quilt was also chosen. She recreated
an antique crib quilt that has been on her to do list 
for a long time. I think it came out great. Good luck Linda.
Temecula Quilt Co sponsored one more top 25 Quilt
made by Emily. I will get a picture of it soon.

Sunday, August 18, 2013

Back To School
This time of year is the perfect opportunity to start a new project.
We are here for you with a couple new Block of the Month Programs.
- - - - - - - - -
Road To Freedom
Finished Quilt - Approx 60" x 74"
 Lori Smith's Road to Freedom 
 We will be making this quilt using primarily Jo Morton
fabrics. Jo's Best Friends line will be the jumping off
point and new fabrics will be added as new Jo lines arrive
 in the shop. Final Setting has not been determined.
Finishing kits will be available at the end of the project.
Here are the details:
- - - - - - - - -
This program will begin shipping in September.
Initial shipment will include pattern.
Each month you will receive fabric for 5 - 5" blocks
- - - - - - - - -
Monthly Kit - $24.00
Shipping and handling - $4.00
Sign up today - Space is limited
1852 Coverlet Memories
Finished Quilt - 45" x 47"
1852 Coverlet Memories is a great project to work on your applique
skills. Each month you will receive fabric and patterns for several motifs
to be appliqued onto a whole cloth background. Here are the details:
- - - - - - - - -
This program will begin shipping in October.
Initial Shipment will include background fabric.
- - - - - - - - -
Monthly Kit - $15.00
Shipping and handling - $3.00
Sign up today - Space is limited
- - - - - - - - -
**Note** fabrics pictured are no longer available.
Great new fabric will be included in your kits.


Thursday, August 8, 2013

New Project
Starting a new project tonight with 
Paula Barnes new line, Hampton Ridge. 

Sunday, August 4, 2013

A "Little" Summer Sewing
I hope all your basket blocks are done and ready to be set. 
I got a "little" carried away and made 3 quilts for a total
of 113 little basket blocks. The first option is a straight set
with 31 blocks and a scalloped border. Super sweet and simple.
 The second option is set on point with 32 blocks, 
sashing and cornerstones. The blocks are floating 
just a bit to give the look of a "little" border.
This blue and white quilt will be perfect for our 
Blue and White Quilt Show coming in October.
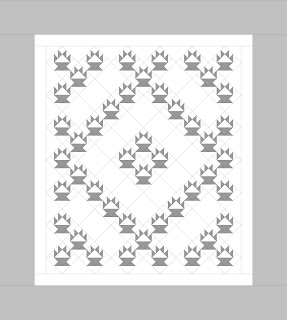
Option 3 uses 50 blocks and is set on point in a
unique pattern. The soft fabrics and Kona natural
 give this quilt a sweet summertime feel.

Option One
Setting Instructions 
finished quilt 21" x 25"
- - - - - - -  
from setting fabric cut:
32 - 2-1/2" squares
3 - 3" x width of fabric strips for borders.
from inner border fabric cut:
2 - 1-1/2" x width of fabric strips
- - - - - - - 
Layout quilt center using diagram above.
Add inner border using your quilts measurements
Add outer border using your quilt measurements.
Quilt as desired - I hand quilted mine.
Scallop border if desired using your favorite method.
If you scallop border - bind using single thickness binding.

Option Two
Setting Instructions
finished quilt 16" x 20"
- - - - - - -
from sashing fabric cut: 80 - 1" x 2-1/2" strips
from cornerstone fabric cut: 49 - 1" squares
from setting triangle fabric cut: 
4 - 7" squares cut twice diagonally
2 - 4" squares cut once diagonally - corners
- - - - - - - 
Layout quilt center using diagram above.
Square up quilt top leaving the blocks floating to create
the appearance of a small border.
Quilt as desired, I used a small stipple
 and finish up with a single thickness binding.

Option Three
Setting Instructions
finished quilt 26" x 28"
- - - - - - -
from background fabric cut: 
21 - 2-1/2" squares
6 - 4" squares cut twice diagonally
2 - 2-1/2" squares cut once diagonally
3 - 1-1/2" x width of fabric strips - outer border
from border fabric cut: 3 - 4" x width of fabric strips
- - - - - - - 
Layout quilt center using diagram above.
Piece rows together diagonally.
Add inner border using your quilts measurements
Add outer border using your quilt measurements.
Quilt as desired, this one I had quilted with a mini baptist fan
pattern, thanks Maria. Bind