It is an exciting day for the TQC Journal. There is a lot to talk about.
Today is the release of the 2025 Mini-a-Month Postcard Collection!
a simple way to start or continue your mini quilt making journey.
Each set includes twelve postcards with a full color photo
on the front and complete color instructions on the back.
You can order one or take advantage of the quantity discounts here.
They make a great gift for all your quilty friends.
This week is the last installment of the Patchwork Potholder Project.
This has been such a fun project. I hope you stuck it out and are
ready to put it this project all together. Thanks for joining me.
Patchwork Potholder Project - Block Twenty Four
= = = = = = = = =
from light print, cut:
1 square, 3" x 3"
4 strips, 1-1/4" x 4"
from navy print, cut:
2 strips, 1" x 3"
2 strips, 1" x 4"
2 squares, 1-3/4" x 1-2/4"
from brown print, cut:
2 squares, 1-3/4" x 1-3/4"
2 strips, 1" x 5-1/2"
2 strips, 1" x 6-1/2"
Making the block
1. Use 1-3/4" navy and brown squares to make four
half-square-triangles. Trim each unit to 1-1/4" square.
2. Layout block and piece together by adding each
border to the center 3" light square.
3. Layer block, batting and back together. Machine or hand
quilt. Important note - Once your block is quilted trim to
6-1/2" square. Bind using single thickness binding.
= = = = = = = = =
Catch up on all the Patchwork Potholder Project details here. 
Patchwork Potholder Project - Block Twenty Five
= = = = = = = = =
from pink print, cut:
12 squares, 1-1/2" x1-1/2"
4 square, 2" x 2"
4 strips, 1-1/4" x 5"
from red print , cut:
1 square, 1" x 1"
from light print, cut:
4 squares, 1-1/4" x 1-1/4"
4 strips, 1" x 2-1/2"
4 squares, 1" x 1"
12 squares, 1-1/2" x 1-1/2"
 |
Making the block 1. Using1-1/2" pink and light squares, make 24 half square triangles. trim units to 1" square. 2. Layout four blocks using 2" pink squares, 1" light squares and half-square-triangles. Piece four blocks measuring 2-1/2" square, including seam allowances. 3. Layout block as diagrammed. Sew units together. 4. Layer block, batting and back together. Machine or hand |

That was sew fun. I hope you enjoyed this project too!
Finish up your quilt by using a ladder stitch to connect
all your special little blocks. Enjoy!

I am really happy with the way this project came out.
If you did not join us but would like to get started
you can find all the details here.

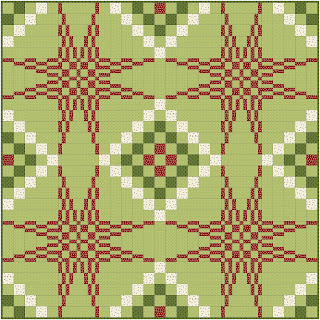
Lets kick off the holiday season with another fun sew along.
I am getting things in order and you will be able to purchase and
download the pattern in the next issue of the TQC Journal. In the
meantime you have a little time to select a size and gather your fabric.
Check out the size options and fabric requirements below.
I hope you will join me!
to download the pattern for this project. Enjoy!

Woven | Bethlehem Star | Small
Finished Quilt 43" x 43"
= = = = = = = = = = = =
2-1/2 yards light green print
Finished Quilt 65 x 65""
2-1/2 yards red print


This is so interesting and fun looking - I will be joining!! Going to stash dive.
ReplyDelete