Title

Title
Showing posts with label Patchwork Potholder Project. Show all posts

Monday, October 7, 2024

TQC Journal | issue 116


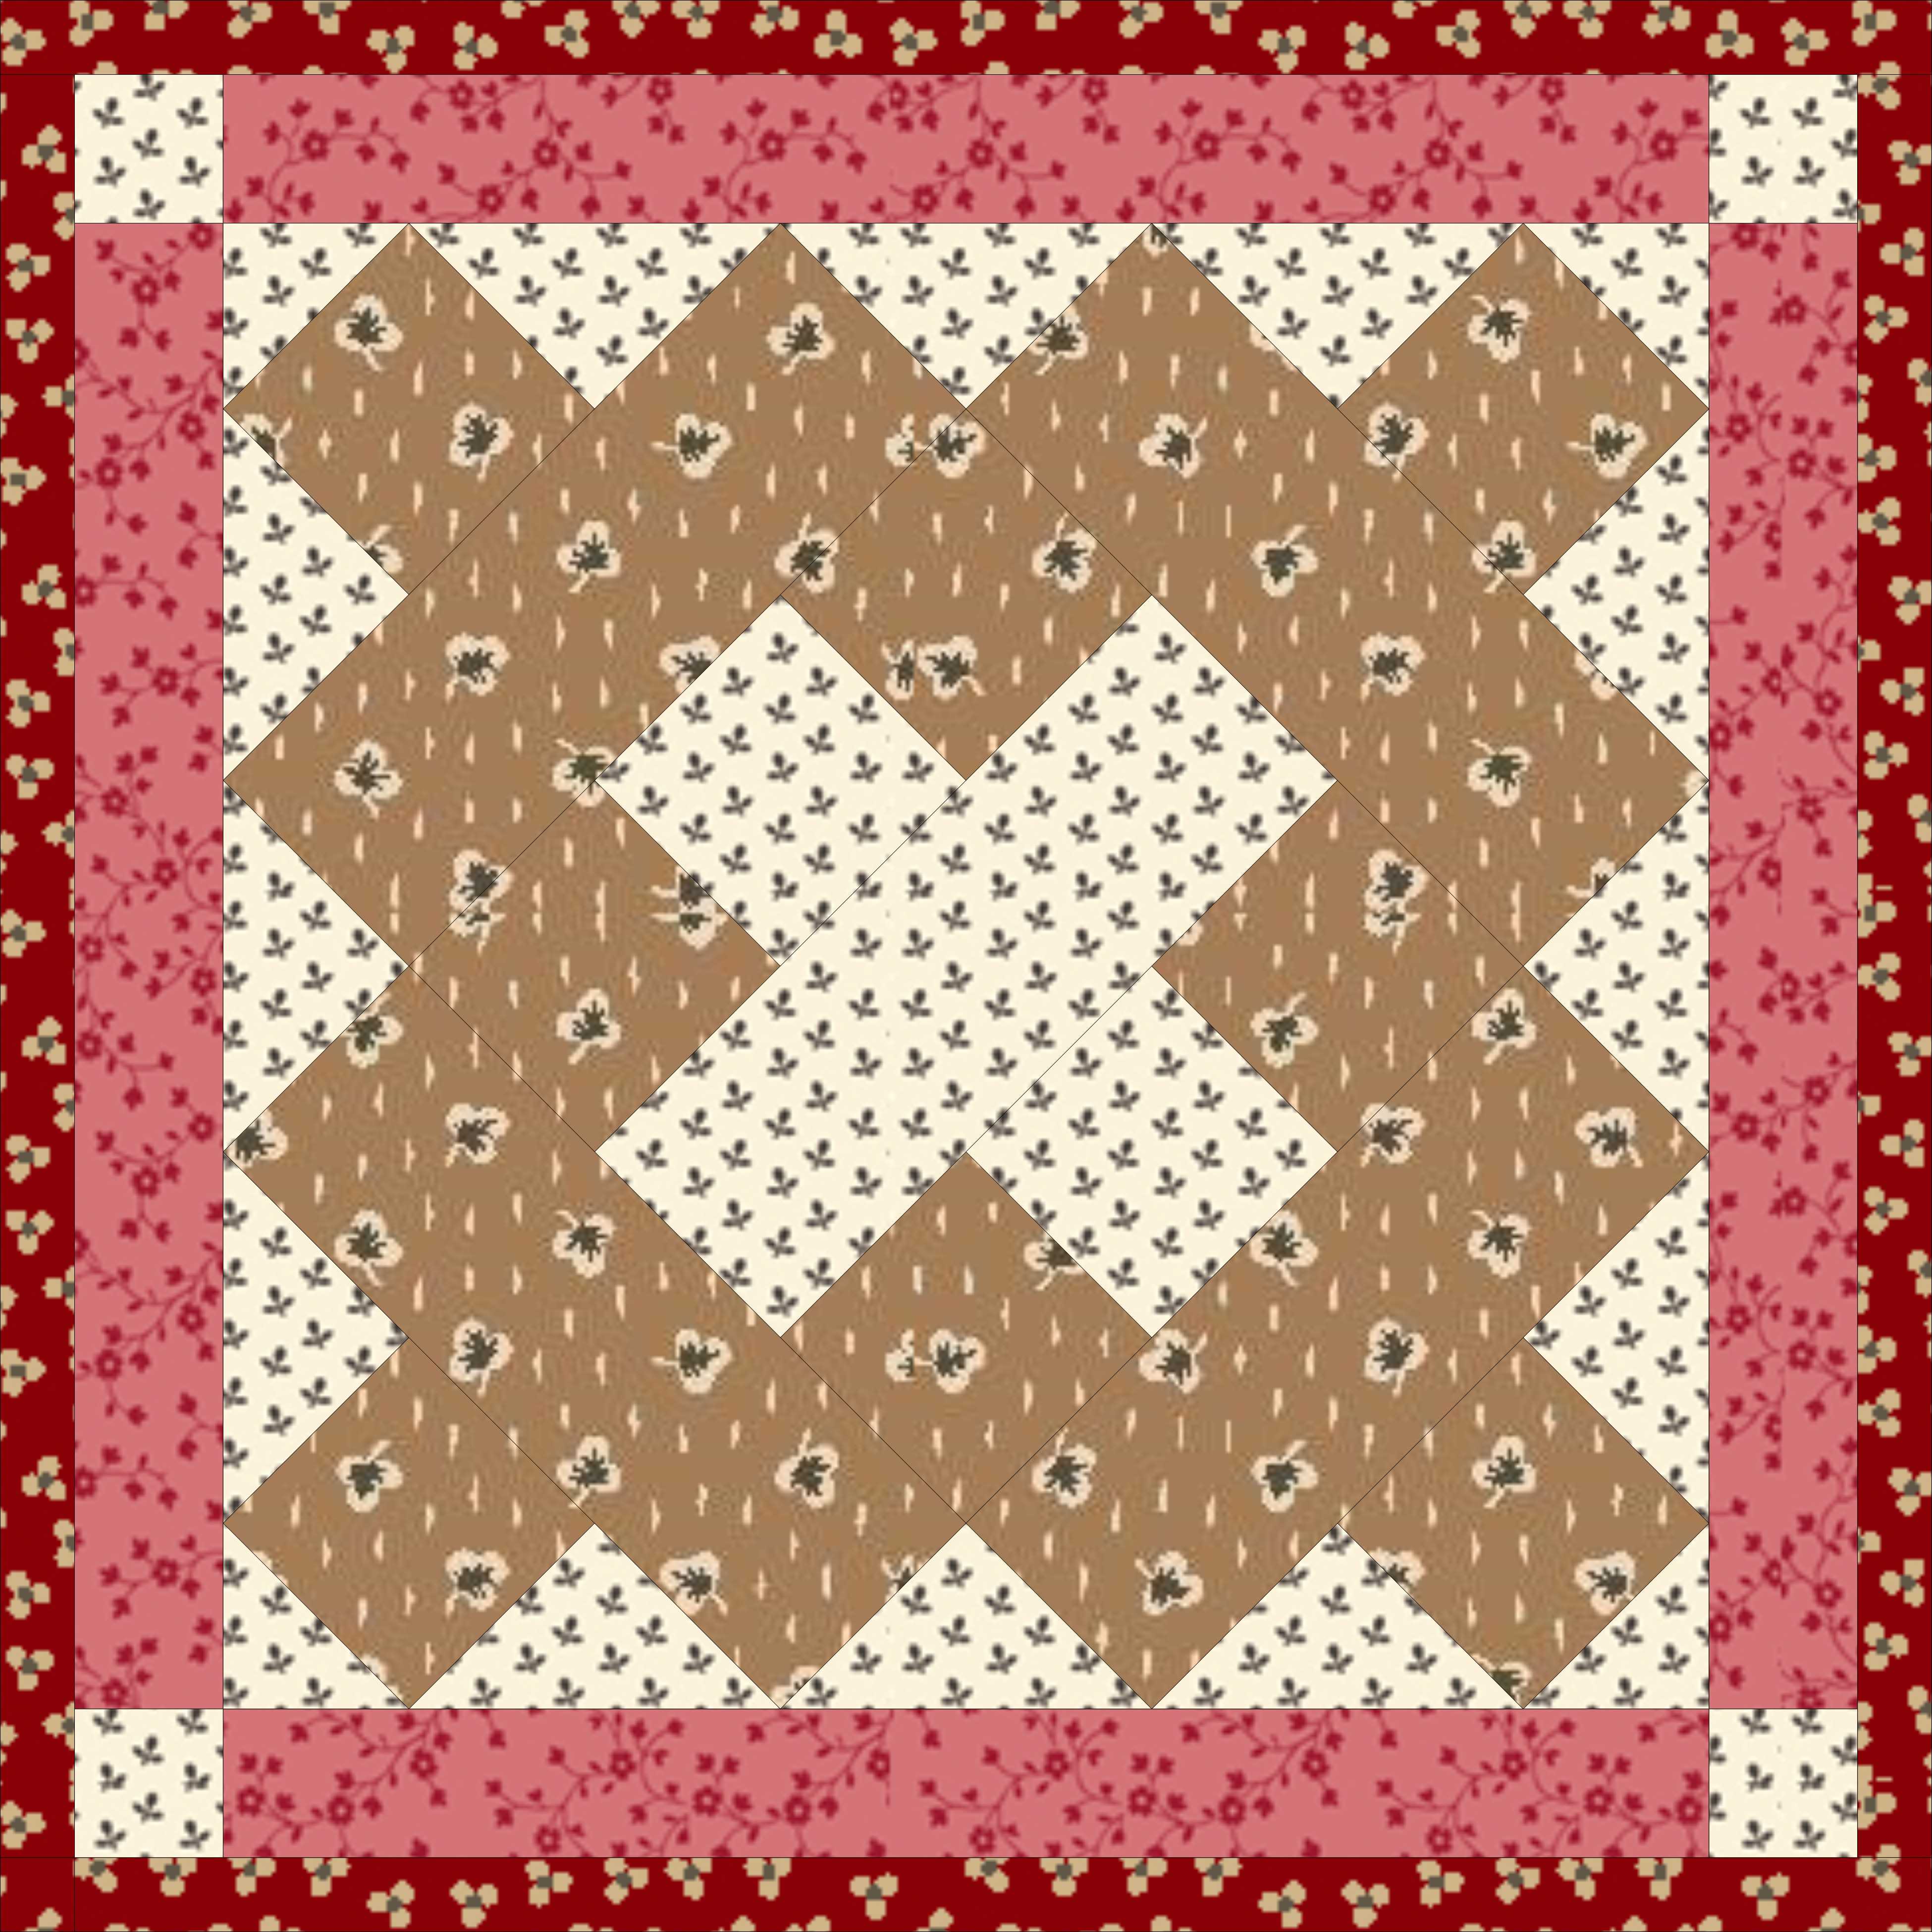
 Patchwork Potholder Project - Block Twenty Three
=  =  =  =  =  =  =  =  =
from red print, cut:
8 squares, 1-11/16" x 1-11/16"
from light print, cut:
2 squares, 1 3/4" x 1-3/4" cut diagonally once
2 squares, 3" x 3" cut diagonally twice
2 squares, 1-11/16" x 1-11/16"
1 rectangle, 1-11/16" x 4-1/16"
2 strips, 1-1/4" x 5-1/2"
2 strips, 1-1/4" x 7"

Making the block
1. Lay out block in diagonal rows. Sew the units in each row
together. Join the rows alternating seams at intersections.
Add corners last. 

2. Add side borders and top and bottom borders. 
Borders are slightly oversized. Trim block to 6-1/2" square

3. Layer block, batting and back together. Machine or hand
quilt. Important note - Once your block is quilted trim to
6-1/2" square. Bind using single thickness binding.
=  =  =  =  =  =  =  =  =
Catch up on all the Patchwork Potholder Project details here. 

Monday, September 30, 2024

TQC Journal | 115


Here is a little sneak peak at my next fabric collection, Woof + Warp.
I am working on a fun project using half-square-triangles, my favorite. 
Woof + Warp will be shipping to your local quilt shop in December
and I will be taking pre-orders in November. 
 Patchwork Potholder Project - Block Twenty Two
=  =  =  =  =  =  =  =  =
from pink print, cut:
2 squares, 1-5/8" x 1-5/8" cut diagonally once
3 squares, 2-3/4" x 2-3/4" cut diagonally twice
1 rectangle, 1-9/16 x 3-11/16
2 squares, 1-9/16" x 1-9/16"
from brown plaid, cut:
2 rectangles, 1-9/16" x 3-11/16"
6 rectangles, 1-9/16" x 2-5/8"
2 squares, 1-9/16" x 1-9/16"

Making the block
1. Lay out block in diagonal rows. Sew the units in each row
together. Join the rows alternating seams at intersections.
Add corners last. 

2. Layer block, batting and back together. Machine or hand
quilt. Important note - Once your block is quilted trim to
6-1/2" square. Bind using single thickness binding.
=  =  =  =  =  =  =  =  =
Catch up on all the Patchwork Potholder Project details here. 
This sweet project was always a favorite of customers when
they visited my brick and mortar. I thought you might like to 
be reminded of it too. Summer Spools was a great little sew
along ten years ago, wow! You can find all the details here. 

Monday, September 16, 2024

TQC Journal | issue 114


Patchwork Potholder Project - Block Twenty One
=  =  =  =  =  =  =  =  =
from light print, cut:
1 square, 6-1/2" x 6-1/2"

Making the block
1. Download the free pattern below. Pattern
include details necessary to complete block.

This pattern will be used for several blocks
that require English Paper Piecing and Applique. 

Visit the free pattern page on my website
to download the pattern for this project. Enjoy!

2. Layer block, batting and back together. Machine or hand
quilt. Important note - Once your block is quilted trim to
6-1/2" square. Bind using single thickness binding.
=  =  =  =  =  =  =  =  =
Catch up on all the Patchwork Potholder Project details here. 
Bygone Baskets is another favorite (can you have too many?)
Take advantage of this Scrappy Savings and grab a copy of the pattern.
It would make the perfect project to fill the cozy fall days ahead. 

Bygone Baskets
Finished Quilt 54" x 71"
Email me for availability 
I would love to help

Monday, September 2, 2024

TQC Journal | issue 113

 
September is here! How is that possible. This months mini is
pretty simple but darling none the less. Grab your postcard
collection and a few scraps and get to work. I have a limited 
number of 2024 postcards left. Place an order here.  
= = = = = = = = = = 
Get ready. The 2025 Mini-a-Month Postcard Collection will
be released next month. 12 all new mini quilts featuring
historical reproduction fabric from my collections with
Marcus Fabrics. If this sounds right up your alley, stay tuned.
 Patchwork Potholder Project - Block Twenty
=  =  =  =  =  =  =  =  =
from black print, cut:
4 strips, 1-1/4" x 5"
from light print, cut:
4 squares, 1-1/4" x 1-1/4"
1 square, 1-5/8" x 1-5/8"
from gold print, cut:
1 square, 4-1/4" x 4-1/4" cut diagonally twice
from brown print, cut:
4 strips, 1-5/8" x 4-1/2"

Making the block
1. Layout block center. Sew gold triangles to each side of two
brown strips. Add brown strips to center 1-5/8" light square.

2. Join three pieces together alternating seams at intersections.
Trim center unit to 5" square, including seam allowances.

3. Add black border to each side of block center. Sew a 1-1/4"
light square to each end of remaining black strips. Sew
to block, alternating seams at intersections.

4. Layer block, batting and back together. Machine or hand 
quilt. Important note - Once your block is quilted trim to 
6-1/2" square. Bind using single thickness binding. 
=  =  =  =  =  =  =  =  =
Catch up on all the Patchwork Potholder Project details here. 

Monday, August 19, 2024

TQC Journal | issue 112

 
 Patchwork Potholder Project - Block Nineteen
=  =  =  =  =  =  =  =  =
from yellow print, cut:
1 bias strip, 3/4" x 9"
1 square, 3-1/4" x 3-1/4" cut diagonally twice
1 square, 7-1/4" x 7-1/4" cut diagonally twice
from light print, cut:
1 rectangle, 3-1/2" x 6-1/2"
1 square, 3-3/4" x 3-3/4" cut once diagonally. 

Making the block
1. Make basket handle by turning under each long edge of bias strip 1/4". 

2. Position handle to 3-1/2" x 6-1/2" light rectangle. Stitch in place.

3. Piece basket body using remaining pieces. Add basket handle
section to basket body section. Block should measure 6 1/2"
square, including seam allowances. 

4. Layer block, batting and back together. Machine or hand 
quilt. Important note - Once your block is quilted trim to 
6-1/2" square. Bind using single thickness binding. 
=  =  =  =  =  =  =  =  =
Catch up on all the Patchwork Potholder Project details here. 

Monday, August 5, 2024

TQC Journal | issue 111


This months mini is the perfect summer project. I love the little
nine patches and a green setting fabric. Grab your Mini-a-Month
Postcard Collection and pick a few of your favorite scraps and 
get started! If you still need a set of postcards you can order here
 Patchwork Potholder Project - Block Eighteen
=  =  =  =  =  =  =  =  =
from red print, cut:
2 squares, 3-1/2" x 3 1/2" cut diagonally twice
1 square, 2-1/2" x 2-1/2"
from light print, cut:
2 squares, 3-1/2" x 3 1/2" cut diagonally twice
4 squares, 2-1/2" x 2-1/2"

Making the block
1. Make four hourglass blocks using red and light triangles.
Trim blocks to 2-1/2" square, including seam allowances. 

2. Lay out block in three rows. Sew the units in each row. 
Join the rows alternating seams at intersections. 

3. Layer block, batting and back together. Machine or hand 
quilt. Important note - Once your block is quilted trim to 
6-1/2" square. Bind using single thickness binding. 
=  =  =  =  =  =  =  =  =
Catch up on all the Patchwork Potholder Project details here. 

Monday, July 29, 2024

TQC Journal | Special Edtion

 
These cute "little" baskets are the result of a Sunday Stitching Session.
Tiny 2" baskets made using my future collection, Woof and Warp.
You will need to be patient, Woof and Warp will be not be available 
until December 2024. Pre orders will be sometime in November. 

 Patchwork Potholder Project - Block Seventeen
=  =  =  =  =  =  =  =  =
from pink print, cut:
1 square, 3-7/8" x 3-7/8" cut diagonally once
1 square, 2" x 2"
1" strip cut on bias for basket handle
from light print, cut:
1 square, 1-1/2" x 1-1/2"
2 rectangles, 1-1/2" x 2-1/2"
1 square, 2" x 2"
1 square, 3-7/8" x 3-7/8" cut diagonally once
2 strips, 1-1/2" x 4-1/2"
2 strips, 1-1/2" x 6-1/2"

Making the block
1. Using 2" light and pink squares, make 2 half square triangles.
Draw a diagonal line of wrong side of light square, sew 1/4" on
 each side of line. Cut on line, press and trim units to 1-1/2"

2. Prepare basket handle by turning under 1/4" on each long side
of 1" bias strip. Place handle on light triangle and hand stitch in place. 

3. Layout units using diagram and piece together. 

4. Add 4-1/2" light strips to each side of block center. Add
light 6-1/2" strips to top and bottom of block. 

5. Layer block, batting and back together. Machine or hand 
quilt. Important note - Once your block is quilted trim to 
6-1/2" square. Bind using single thickness binding. 
=  =  =  =  =  =  =  =  =
Catch up on all the Patchwork Potholder Project details here. 
Fifth Monday Freebie
I love little baskets quilts and I am betting you do too. 
Here is another fun basket project for you to enjoy. 
Bonus: These cute eggs are also included in this free pattern. 
Download the free pattern and get started today. 

Visit the free pattern page on my website
to download the pattern for this project. Enjoy!

Monday, July 15, 2024

TQC Journal | issue 110

 
Patchwork Potholder Project - Block Sixteen
=  =  =  =  =  =  =  =  =
from pink print, cut:
1 square, 6-1/2" x 6-1/2"

Making the block
1. Download the free pattern below. Pattern
include details necessary to complete block.

This pattern will be used for several blocks
that require English Paper Piecing and Applique. 

Visit the free pattern page on my website
to download the pattern for this project. Enjoy!

2. Layer block, batting and back together. Machine or hand
quilt. Important note - Once your block is quilted trim to
6-1/2" square. Bind using single thickness binding.
=  =  =  =  =  =  =  =  =
Catch up on all the Patchwork Potholder Project details here. 

Take advantage of some Scrappy Savings on this
Temecula Quilt Co classic. Temecula Album Quilt
is a great combination of wonderful blocks with
a pretty patriotic color combination. 

Email me for availability 
I would love to help

Monday, July 1, 2024

TQC Journal | issue 109

 
The classic red, white and blue color combo is highlighted with
a dash of soft pink. What could be better. This months mini will 
go together in no time. Grab your 2024 Mini-a-Month Postcard
Collection and get started to day. Still need a copy? Order here

 Patchwork Potholder Project - Block Fifteen
=  =  =  =  =  =  =  =  =
from tan print, cut:
8 squares, 1-3/8" x 1-3/8"
4 rectangles, 1-3/8" x 3-1/8
from light print, cut:
2 squares, 1-1/2" x 1-1/2" cut diagonally once
2 squares, 1-3/8" x 1-3/8"
1 rectangle, 1-3/8" x 3-1/8"
3 squares, 2-3/4" x 2-3/4" cut diagonally twice
4 squares, 1" x 1"
from pink print, cut:
4 strips, 1" x 5-1/2"

Making the block
1. Layout block center using tan and light pieces in diagonal rows.

2. Add corner triangles last.

3. Add 1" pink borders to each side of block center. Sew
1" light squares to each end of remaining 1" pink strips. 
Add these border to top and bottom of quilt. 

4. Layer block, batting and back together. Machine or hand 
quilt. Important note - Once your block is quilted trim to 
6-1/2" square. Bind using single thickness binding. 
=  =  =  =  =  =  =  =  =
Catch up on all the Patchwork Potholder Project details here. 

Thank you to everyone who placed an Everyday Essentials
 pre order. I am waiting for the fabric to arrive and I should have
all your orders in the mail in a few weeks. I know it is hard to
wait but it will be worth it! If you would still like some of 
these perfect little shirting's check your local quilt shop 
or your favorite online retailer. 

Monday, June 17, 2024

TQC Journal | issue 108


E v e r y d a y   E s s e n t i a l s   P r e o r d e r 
Shirting’s were a fashion necessity in the late 1800s, used to make
men's shirts and Gibson Girl blouses through the turn of the century.
Traditionally, these were lightweight cotton prints with small,
simple black motifs on a white ground. Today, their low volume
 appearance makes them the perfect pairing for your
favorite dark and medium calicos. I think Everyday Essentials
 will make a great addition to your scrap basket!

Take a closer look at Everyday Essentials here.

Everyday Essentials is due to arrive sometime in July. 
Check out the free kit with all preorders placed
 by Saturday June 22 below. Place a pre order here

Everyday Dresden  |  Free Kit with Preorder
Finished Quilt 18” x 21-1/2"

Preorder must be placed by Saturday, June 22 to qualify.
Kit includes pattern, fabric for quilt top and binding.

Visit the free pattern page on my website
to download the pattern for this project. Enjoy!

Patchwork Potholder Project - Block Fourteen
=  =  =  =  =  =  =  =  =
from light print, cut:
1 square, 6-1/2" x 6-1/2"

Making the block
1. Download the free pattern below. Pattern
includes details necessary to complete block.

This pattern will be used for several blocks
that require English Paper Piecing and Applique. 

Visit the free pattern page on my website
to download the pattern for this project. Enjoy!

2. Layer block, batting and back together. Machine or hand
quilt. Important note - Once your block is quilted trim to
6-1/2" square. Bind using single thickness binding.
=  =  =  =  =  =  =  =  =
Catch up on all the Patchwork Potholder Project details here. 
=  =  =  =  =  =  =  =  =

Catch up on all the Patchwork Potholder details here.
This is the perfect quilt for a little summer sewing.
Take advantage of these Scrappy Savings and
add this beauty to your to do list. 

God Bless America
Finished Quilt 54" x 69"
Email me for availability 
I would love to help

Monday, June 3, 2024

TQC Journal | issue 107

 
Halfway through the 2024 Mini-a-Month Postcard Collection.
This sweet little bowtie quilt is a great place to showcase some
of you fabric scraps. Still need a set? Order here
Patchwork Potholder Project - Block Thirteen
=  =  =  =  =  =  =  =  =
from red print, cut:
1 square, 6-1/2" x 6-1/2"

Making the block
1. Download the free pattern below. Pattern
includes details necessary to complete block.

This pattern will be used for several blocks
that require English Paper Piecing and Applique. 

Visit the free pattern page on my website
to download the pattern for this project. Enjoy!

2. Layer block, batting and back together. Machine or hand
quilt. Important note - Once your block is quilted trim to
6-1/2" square. Bind using single thickness binding.
=  =  =  =  =  =  =  =  =
Catch up on all the Patchwork Potholder Project details here. 

Monday, May 20, 2024

TQC Journal | issue 106


Liberty Legacy preorders are here!
Liberty Legacy's rich reds, beautiful blues, and creams, with a
dash of gold and cheddar are perfect for a quilt that celebrates
Liberty, but also creates a quilt with lasting legacy.

Download my free project, Liberty Squares, and take a
 closer look at this collection on the
Marcus Fabrics website.


Liberty Legacy
Finished Quilt 38" x 45"
I really appreciate your preorder of Liberty Legacy.
Pick your favorite bundle size an place a preorder here

 As a little treat for you! Download the free pattern for
Liberty Legacy below. I cut a few Brown Booster Bundles
that will be a
 great addition to your Liberty Legacy bundle.  

Visit the free pattern page on my website
to download the pattern for this project. Enjoy!  
Little Legacy
Finished Quilt 20-1/4" x 20-1/4"

As a thank you for your preorder of Liberty Legacy I will include
 free kit for Little Legacy if your preorder is
 placed by May 31
The kit includes the pattern, fabric for quilt top and binding. 

Liberty Legacy arrives in June and your preorder will
ship as soon as fabric arrives. Place your preorder here. 
 Patchwork Potholder Project - Block Twelve
=  =  =  =  =  =  =  =  =
from light print, cut:
1 square, 6-1/2" x 6-1/2"

Making the block
1. Download the free pattern below. Pattern
includes details necessary to complete block.

This pattern will be used for several blocks
that require English Paper Piecing and Applique. 

Visit the free pattern page on my website
to download the pattern for this project. Enjoy!

2. Layer block, batting and back together. Machine or hand
quilt. Important note - Once your block is quilted trim to
6-1/2" square. Bind using single thickness binding.
=  =  =  =  =  =  =  =  =
Catch up on all the Patchwork Potholder Project details here. 
Planning a picnic? I think this quilt would make
 the perfect picnic quilt. Grab this pattern as
at a scrappy savings. Enjoy!

Patchwork Picnic
Finished Quilt 55" x 63"

Monday, May 6, 2024

TQC Journal | issue 105


So sorry for the previous post with no information. My
work ahead finally caught up with me. I didn't want you
to miss out so here you go.

This months mini is one of my all time favorites. 
What is it about little squares! I hand pieced this one and
had a great time. I still think I prefer machine piecing but
 doing it by hand is a nice change of pace. 
If you are interested in making one of you own and you
don't have the 2024 Mini-a-Month Postcard Collection
yet you can order one here. 
If you have been keeping up with our Potholder Project
You now have enough little cuties to connect a few rows. 
I use a ladder stitch on the back to do this. Here is a
tutorial that I found that is really easy to follow. 
  Patchwork Potholder Project - Block Eleven
=  =  =  =  =  =  =  =  =
from pink print, cut:
4 squares, 1-1/4" x 1-1/4"
4 squares, 2-1/8" x 2-1/8"
4 strips, 1-1/4" x 5-1/2"
from light print, cut:
4 squares, 1-3/4" x 1-3/4"
1 square, 3-11/16 x 3-11/16 
1 square, 3" x 3"
4 squares, 1-1/4" x 1-1/4"
Making the block

1. Using 3-11/16" and 2-1/8" light and pink squares make four
flying geese units. Click here for flying geese tutorial.
Your blocks should measure 1-3/4" x 3", including
seam allowances. 

2. Sew pink 1-1/4" squares diagonally to each corner
of the 3" light square. Trim seam allowance and press. 

3. Using flying geese, light 1-3/4" squares and light center,
layout star in three rows of three units. Sew the units in each
 row together. Join the rows alternating seams at intersections.

4. Add 1-1/4" x 5-1/2" pink strips to each side of block. Sew
1-1/4" light square to each end of remaining 5-1/2" pink 
strips and add to top and bottom of block.  

5. Layer block, batting and back together. Machine or hand 
quilt. Important note - Once your block is quilted trim to 
6-1/2" square. Bind using single thickness binding. 
=  =  =  =  =  =  =  =  =
Catch up on all the Patchwork Potholder Project details here. 
=  =  =  =  =  =  =  =  =
Catch up on all the Patchwork Potholder details here. 

Monday, April 29, 2024

TQC Journal | Special Edition

 
I have been working on a new project with my next collection with
Marcus Fabrics. It arrives in June, Liberty Legacy will be perfect for
a summer project. Preorders will start mid May. 
Patchwork Potholder Project - Block Ten
=  =  =  =  =  =  =  =  =
from light print, cut:
5 squares, 1- 9/16" x 1-9/16"
3 squares, 2-3/4" x 2-3/4" cut diagonally twice
2 square, 1-3/4" x 1-3/4" cut diagonally once
from navy print, cut:
16 squares, 1-9/16" x 1-9/16"
from cheddar print, cut:
4 squares, 1-9/16" x 1-9/16"

Making the block
1. Layout block in diagonal rows as diagrammed above.

2. Sew units into diagonal rows. Join the rows alternating
seams at intersections. Add corners last.

3. Layer block, batting and back together. Machine or hand 
quilt. Important note - Once your block is quilted trim to 
6-1/2" square. Bind using single thickness binding. 
=  =  =  =  =  =  =  =  =
Catch up on all the Patchwork Potholder Project details here. 


It is time for another Fifth Monday Freebie! I have had two
email requests for this retired pattern in the last couple of days
so I took it as a sign that it must be popping up some where,
probably Pinterest.  Maybe you would like a copy too. 
Download the free PDF printable pattern below. 

Four Corners
Finished Quilt 50" x 60"

Monday, April 15, 2024

TQC Journal | issue 104


  Patchwork Potholder Project - Block Nine
=  =  =  =  =  =  =  =  =
from red print, cut:
4 squares, 2" x 2"
1 square, 3" x 3"
2 strips, 1" x 4-1/2"
2 strips, 1" x 5-1/2"
from light print, cut:
4 squares, 2" x 2"
1 square, 3" x 3"
1 square, 1-1/2" x 1-1/2"
2 strips, 1-1/2" x 2-1/2"
2 strips, 1" x 5-1/2"
2 strips, 1" x 6-1/2"


Making the block
1. Using 2" light and red squares make seven half-square-triangles.
Draw a diagonal line on wrong side of light squares.
Place a marked square on a light and red square, right sides together.
Sew 1/4" from both sides of the drawn line, cut on line and press.
Trim the half-square-triangle unit to 1-1/2" square

2. Repeat steps above with 3" light and red squares.
Trim one half-square-triangle unit to 2-1/2" square.

3. Layout and piece basket block as diagrammed above. 

4. Add 1" x 4-1/2" red strips to each side of block. 
Add 1" x 5-1/2" red strips to top and bottom of block.
Repeat with 1" light strips. 

5. Layer block, batting and back together. Machine or hand
quilt. Important note - Once your block is quilted trim to
6-1/2" square. Bind using single thickness binding.
=  =  =  =  =  =  =  =  =
Catch up on all the Patchwork Potholder Project details here. 

I was walking through my home trying to decide which
quilt to offer for this months Scrappy Savings and this quilt
seemed like the obvious choice. Spring Scraps is a great mix
of all my favorite scraps with an extra special border. 
Take a closer look here and grab your copy. Enjoy! 

Spring Scraps
Finished Quilt 54" x 66"


Monday, April 1, 2024

TQC Journal | issue 103


I hope spring has sprung in your neck of the woods. The grass
 green and perfect pink really set off those little four patches.
Pull out your 2024 Mini-a-Month Postcard Collection
and spend some time this week with your little scraps.
 =  =  =  =  =  =  =  =  =  =  =
I still have some 2024 Mini-a-Month Postcard Collections
If you would like to order one, you can do so here.
Note - I am out of town welcoming my newest grandchild. 
I will ship your order as soon as I return next week. 
 Patchwork Potholder Project - Block Eight
=  =  =  =  =  =  =  =  =
from red print, cut:
1 square, 2-1/2" x 2-1/2"
4 squares, 1-7/8" x 1-7/8" 
from light print, cut:
4 squares, 1-1/2" x 1-1/2"
1 square, 3-3/16 x 3-3/16" 
2 strips, 1-1/2" x 4-1/2"
2 strips, 1-1/2" x 6-1/2"

Making the block
1. Using 3-3/16" and 1-7/8" light and red squares make four
flying geese units. Click here for flying geese tutorial.
Your blocks should measure 1-1/2" x 2-1/2", including
seam allowances. 

2. Using flying geese, light 1-1/2" squares and red 2-1/2"
square. Layout star in three rows of three units. Sew the units
 in each row together. Join the rows alternating seams at intersections.

3. Add 1-1/2" x 4-1/2" light strips to each side of block. Repeat
adding 1-1/2" x 6-1/2" strips to top and bottom of block. 

4. Layer block, batting and back together. Machine or hand 
quilt. Important note - Once your block is quilted trim to 
6-1/2" square. Bind using single thickness binding. 
=  =  =  =  =  =  =  =  =
Catch up on all the Patchwork Potholder Project details here. 
=  =  =  =  =  =  =  =  =
Catch up on all the Patchwork Potholder details here.